nDTomoGUI
Overview
The nDTomoGUI provides a feature-rich, PyQt5-based graphical user interface for the visualization, inspection, and analysis of chemical imaging data, with a particular focus on hyperspectral X-ray computed tomography (CT) datasets, such as XRD-CT volumes.
It is designed to be accessible to users from various scientific domains, allowing non-programmers to perform complex data operations such as region selection, pattern extraction, segmentation, and pixel-wise peak fitting — all from a structured tabbed interface.
With full support for .h5 and .hdf5 files containing 3D arrays (X, Y, spectral channels), users can explore datasets interactively, generate ROI maps, export patterns, and fit peak models with minimal setup.
Launching the GUI
To start the GUI:
Ensure nDTomo is installed and your environment is activated.
Launch the GUI from a terminal:
conda activate ndtomo
nDTomoGUI
The interface will open in a standalone window. No coding or scripting is required beyond this point.
Tabs and Features
The GUI is organized into four main tabs, each representing a logical stage in the data exploration and analysis pipeline.
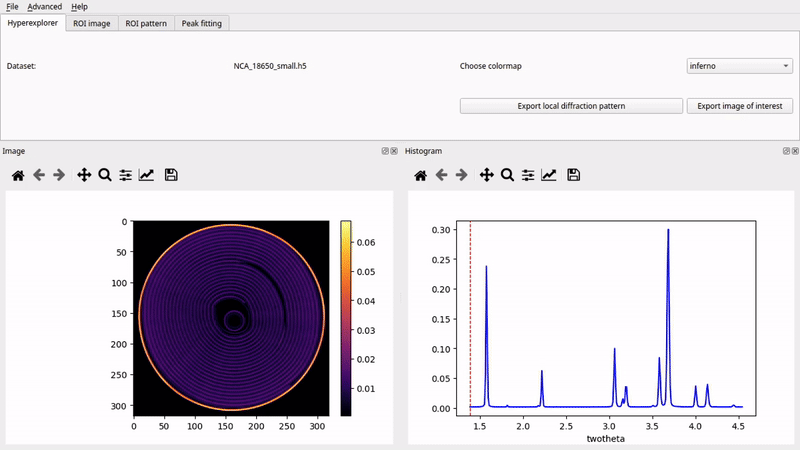
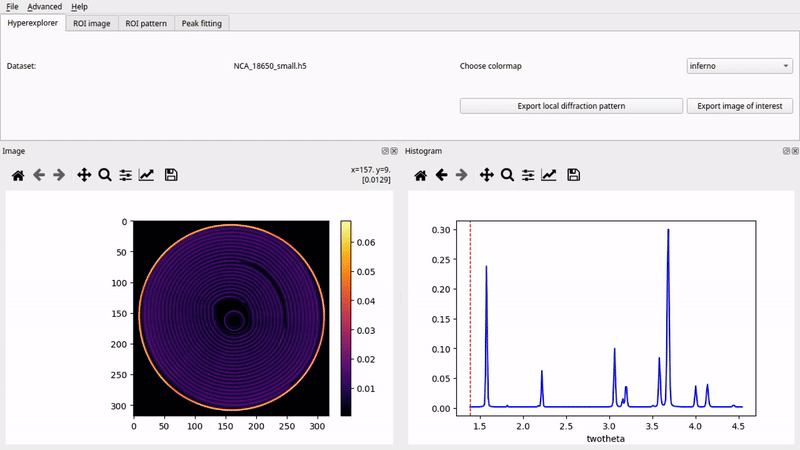
1. Chemical imaging data
This tab is the main interface for loading chemical imaging datasets and exploring their spatial and spectral content interactively. It is composed of two panels:
The top image panel shows a 2D slice of the dataset (e.g. a mean image or a slice at a selected spectral index).
The lower spectrum panel displays a 1D spectrum (e.g. a mean spectrum or the local spectrum at a selected pixel).
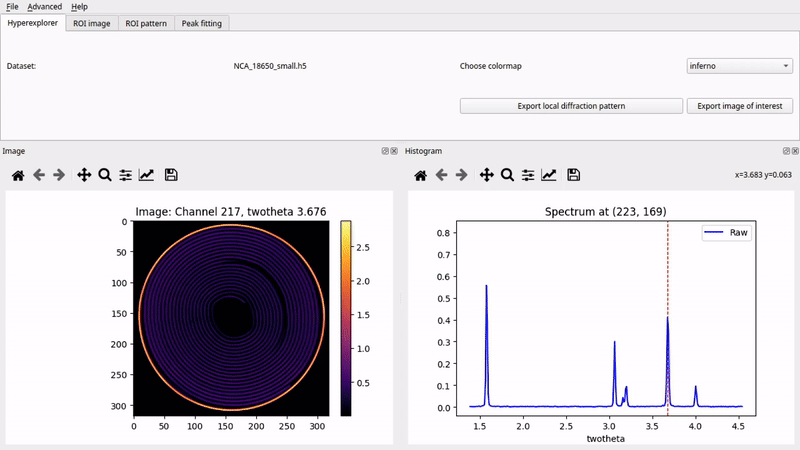
When a file is loaded, the software computes and displays the average image and average spectrum across the dataset. The panels are linked: moving the mouse over one panel dynamically updates the other. This enables intuitive inspection of the correlation between image regions and local spectral features.
How to use:
Click “File > Open Chemical imaging data” to load a .hdf5 or .h5 file.
The software automatically looks for a dataset under /data, and for a corresponding spectral axis (/tth, /q, /d, or /energy). If not found, a default integer index is used.
The main image panel shows the mean image over all spectral channels.
The lower plot displays the mean spectrum over all spatial pixels.
Hover over the image to update the spectrum dynamically for a given (x, y) pixel.
Hover over the spectrum to explore corresponding image slices at specific channels.
Use mouse scroll to zoom and drag to pan both plots.
Left-click enables real-time spectrum updates; right-click disables it.
Additional features:
Change the colormap using the dropdown labeled “Choose colormap”.
Click “Export local diffraction pattern” to save the current pixel’s spectrum as .asc, .xy, and .h5.
Click “Export image of interest” to save the current image slice as .png and .h5.
This tab enables intuitive, interactive exploration of your chemical imaging dataset without the need for scripting.
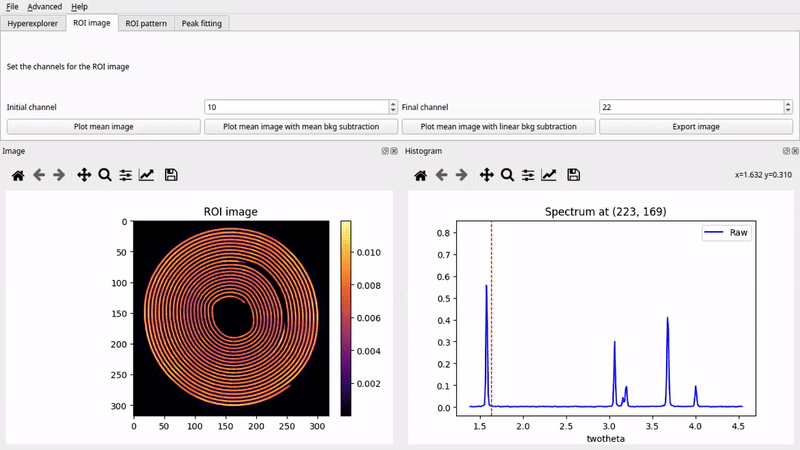
2. ROI image
This tab enables users to define a region of interest (ROI) by selecting a range of spectral channels (i.e. bins). A 2D projection image is generated by summing or processing data across that range. This image can be used for segmentation or peak fitting later in the workflow. The layout includes input controls for channel selection, buttons to apply background subtraction strategies, and export options.
How to use:
Use the “Initial channel” and “Final channel” spinboxes to set the spectral range of interest.
Click “Plot mean image” to generate an image by summing intensities across the selected channels.
Alternatively, apply background correction: - “Plot mean image with mean bkg subtraction” subtracts the mean of the endpoints. - “Plot mean image with linear bkg subtraction” fits a linear background voxel-wise and subtracts it.
A thresholded mask is automatically generated where pixel values > 5% are retained (used in the next tab).
Click “Export image” to save the ROI image as .png and .h5.
Note: Selecting a new channel range also updates the default initial guess for peak fitting in Tab 4.
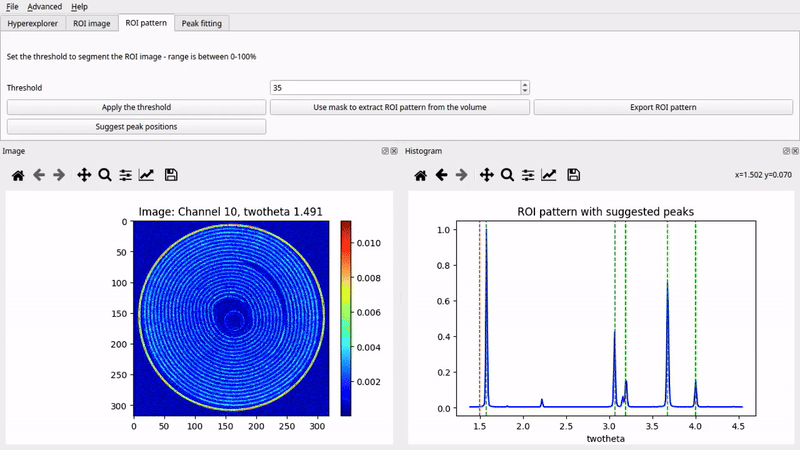
3. ROI pattern
This tab provides tools to perform segmentation of the ROI image and extract a characteristic spectrum from a selected region. It includes controls to apply a threshold, preview the binary mask, and sum the dataset only over masked regions to generate a representative spectrum. Peak suggestion tools are also provided.
How to use:
Set a threshold using the spinbox (range: 0–100).
Click “Apply the threshold” to segment the image. Pixels below the threshold are masked out.
Click “Use mask to extract ROI pattern from the volume” to compute a spectrum by summing all voxels within the mask across spectral channels.
The resulting spectrum is plotted and normalized.
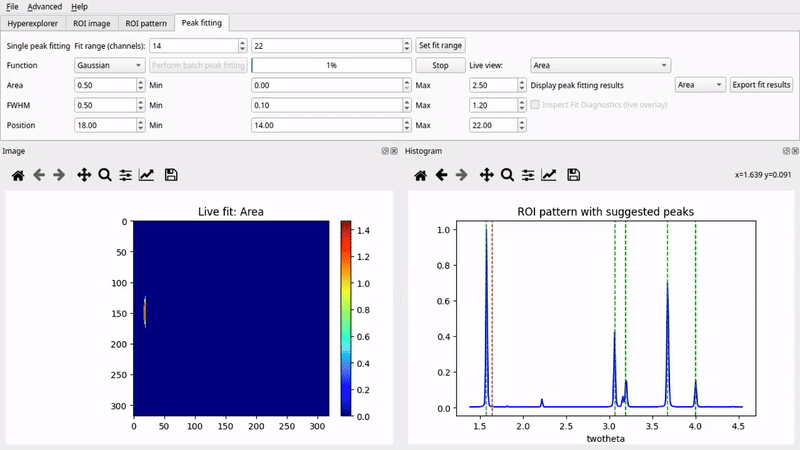
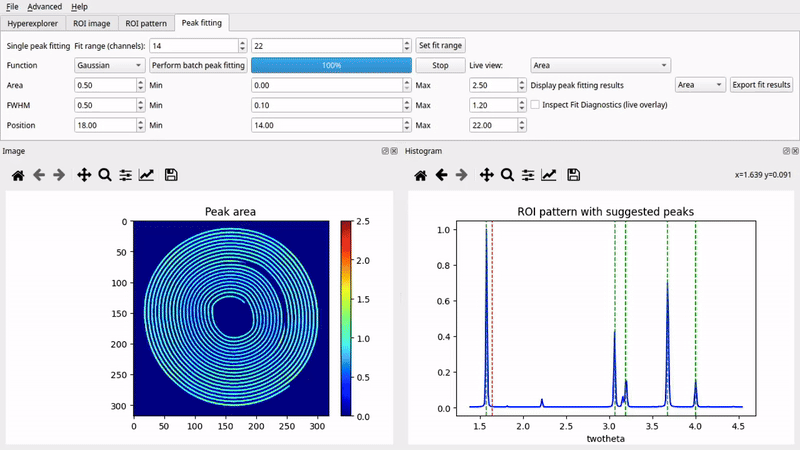
Click “Suggest peak positions” to use scipy.signal.find_peaks() to detect peak locations. These are overlaid as vertical lines on the spectrum.
The GUI automatically updates the image view to show the slice corresponding to the first detected peak.
Click “Export ROI pattern” to save the spectrum as .asc, .xy, and .h5.
This tab bridges the spatial and spectral domains by allowing pixel-level filtering and extraction of chemically significant signals.
4. Peak fitting
This tab enables batch peak fitting of a single peak across the dataset. You can choose a model (Gaussian, Lorentzian, or Pseudo-Voigt), configure initial guesses and parameter bounds, and run the fitting process interactively. The layout includes parameter input boxes, model selector, fit range controls, progress indicators, and live result visualization.
Supported peak models: - Gaussian - Lorentzian - Pseudo-Voigt (with adjustable Gaussian/Lorentzian mixing)
How to use:
Define fitting range: - Set Fit range (channels) via the two spinboxes. - Click “Set fit range” to confirm and apply the selection.
Choose model: - Use the Function dropdown to select the desired peak profile. - For Pseudo-Voigt, the Mixing γ (0 = Gaussian, 1 = Lorentzian) parameter appears.
Set initial values and bounds: - Adjust initial guess and min/max for:
Area (peak amplitude × width)
Position (peak center)
FWHM (width)
γ (mixing fraction, if applicable)
Start fitting: - Click “Perform batch peak fitting”. - The progress bar will update as each row is completed. - A live parameter map (e.g., Area, Position, FWHM) is shown during fitting. - Change Live view dropdown to switch which parameter is shown live.
After fitting completes: - Use the “Display peak fitting results” dropdown to view specific parameter maps. - Optionally, enable “Inspect Fit Diagnostics” to overlay raw, fitted, and residual spectra interactively. - Click “Export fit results” to save all fitting outputs to an .h5 file.
Outputs saved: - Area, Position, FWHM, Background1 (slope), Background2 (intercept) - Fraction (if Pseudo-Voigt was used)
This tab turns raw imaging data into quantifiable chemical maps using robust curve fitting.
Additional Features
In addition to the four core tabs, nDTomoGUI includes several advanced tools accessible via the top menu bar under Advanced. These features provide power users and developers with additional capabilities for simulation, testing, debugging, and interactive exploration.
Synthetic Phantom Generator
Accessed via Advanced > Create Phantom Dataset
The Synthetic Phantom Generator allows users to instantly generate a chemically realistic, hyperspectral dataset without relying on experimental data. This is ideal for:
Benchmarking fitting and segmentation methods
Teaching hyperspectral imaging concepts
Testing downstream tools or algorithms
Verifying new features without the need for a beamline dataset
How it works:
Internally, the GUI loads five example diffraction patterns (dpAl, dpCu, dpFe, dpPt, dpZn) corresponding to aluminum, copper, iron, platinum, and zinc.
These are combined with spatial image templates (phantoms) using functions from nDTomo.sim.phantoms.
Users do not need to configure anything — clicking the menu option will automatically create a 3D dataset with: - A shape of (X, Y, Channels) where X = Y = 200 pixels - Five chemically distinct regions, each corresponding to one of the reference spectra - A synthetic spectral axis (e.g., 2theta) used for plotting and fitting
After creation:
The synthetic volume is loaded into the GUI just like a normal dataset.
Users can explore, segment, and fit the phantom using all other GUI tools.
The current dataset label will update to “Synthetic Phantom”.
No external files are written unless the user explicitly exports the volume or results.
This is especially helpful for verifying that peak fitting models behave as expected and that segmentation pipelines produce the correct spatial maps.
Embedded IPython Console
Accessed via Advanced > Open IPython Console
The embedded IPython console provides an interactive Python shell inside the GUI, allowing advanced users to inspect, modify, and visualize data during any stage of analysis.
This feature is particularly valuable for:
Debugging complex workflows
Manually inspecting specific values, slices, or spectra
Testing small script snippets against live GUI data
Custom plotting beyond the standard GUI capabilities
Console features:
Full IPython support, including tab completion, history, and inline plotting
Immediate access to key internal variables, such as:
volume      # 3D hyperspectral dataset (np.ndarray)
image       # Currently viewed 2D slice
spectrum    # Current spectrum (e.g., from hover or ROI)
xaxis       # Spectral axis (e.g., 2theta, q, or energy)
np, plt     # NumPy and Matplotlib available by default
gui         # Reference to the main nDTomoGUI object
Example uses:
Plot a custom spectrum:
plt.plot(xaxis, spectrum)
plt.title("Current spectrum")
plt.xlabel("2θ")
plt.ylabel("Intensity")
plt.show()
Check the shape of the loaded dataset:
volume.shape
Manually export a slice or spectrum:
np.savetxt("myspectrum.txt", np.column_stack((xaxis, spectrum)))
Exit instructions:
The console runs in-process and is fully integrated with the GUI event loop.
To close the console, use the menu option again or click the x on the console dock.
Console variables will persist as long as the GUI session is active.
This console transforms nDTomoGUI from a fixed-function viewer into a flexible chemical imaging workbench, enabling hybrid GUI-code workflows ideal for advanced users.
—
File Handling and Export
Supports .h5 / .hdf5 formats only.
Click File > Append Chemical imaging data to concatenate a second volume (x-axis append).
Use File > Save Chemical imaging data to export the current volume and x-axis.
Exported .h5 files follow a consistent structure for downstream analysis.
Limitations and Notes
Currently supports single-peak models only — multi-peak or Rietveld fitting is not implemented.
Fitting is done on CPU using scipy.optimize.curve_fit, which may be slow for large volumes.
GPU acceleration or parallel execution is under consideration for future releases.
Only 3D volumes with shape (X, Y, Channels) are supported; time-resolved or higher-D datasets are not yet compatible.
Developer Notes
Main GUI class:
- class nDTomo.gui.nDTomoGUI.nDTomoGUI[source]
Bases:
QMainWindowA PyQt5 GUI for visualizing and analyzing chemical imaging datasets.
This interface enables interaction with hyperspectral or diffraction tomography data. Users can load datasets, explore image/spectrum slices, extract ROIs, perform peak fitting, and export results. Features include segmentation, dynamic cursor inspection, batch fitting, and in-GUI IPython console support.
- volume
The loaded 3D data volume (X, Y, Channels).
- Type:
np.ndarray
- xaxis
The 1D array for the spectral or scattering axis.
- Type:
np.ndarray
- image
2D image slice shown in the main display.
- Type:
np.ndarray
- spectrum
1D spectrum shown in the spectral viewer.
- Type:
np.ndarray
- chi, chf
Start and end channel indices for ROI selection.
- Type:
- mask
Binary mask (same XY shape as image) used for ROI operations.
- Type:
np.ndarray
- append_file()[source]
Append an additional chemical imaging dataset to the current volume along the X-axis (axis=0).
Opens a file dialog to select a new HDF5 dataset and checks for compatibility with the currently loaded volume. If the height and spectral dimensions match, the new volume is concatenated column-wise. The GUI is updated accordingly.
Notes
Only appends if the new volume has the same shape in dimensions 1 and 2 (height and spectral).
If necessary, the new volume is transposed to match the shape of the existing dataset.
Updates internal volume, dataset label, and spinbox limits.
- Raises:
KeyError – If the ‘/data’ dataset is not found in the appended file.
ValueError – If shape compatibility is not met (different height or spectral axis).
- batchpeakfit()[source]
Perform batch single-peak fitting over the masked region of the dataset.
This method collects all peak fitting parameters from the GUI (initial guesses and bounds) and applies them to the currently selected volume region (volroi) using a user-defined peak model (Gaussian, Lorentzian, or Pseudo-Voigt). It applies the segmentation mask to restrict the fitting region, initializes a FitData thread for asynchronous processing, and connects the progress and result signals for GUI updates.
Notes
If the fitting type is Pseudo-Voigt, the mixing fraction is also passed to the fitting class.
The fitting thread is non-blocking and results are streamed progressively.
Disables interactive diagnostic display and the “Fit” button until completion.
- changecolormap(ind)[source]
Change the active colormap used for image display.
- Parameters:
ind (int) – Index of the selected colormap from self.cmap_list.
Notes
Updates the display immediately to reflect the new colormap.
- channel_final(value)[source]
Set the final channel index for the ROI (Region of Interest) image.
- Parameters:
value (int) – The ending spectral channel to define the ROI range.
- channel_initial(value)[source]
Set the initial channel index for the ROI (Region of Interest) image.
- Parameters:
value (int) – The starting spectral channel to define the ROI range.
- check_and_transpose()[source]
Check the shape of the loaded volume and apply a transpose if necessary.
Ensures that the volume has shape (X, Y, Channels). If the first dimension matches the spectral length instead of spatial axes, the array is transposed accordingly to bring it to the expected format.
Notes
Transposes (0, 2, 1) if volume.shape[0] == volume.shape[2]
Transposes (1, 2, 0) if volume.shape[1] == volume.shape[2]
- closeEvent(ce)[source]
Override the Qt closeEvent handler to ensure proper shutdown.
- Parameters:
ce (QCloseEvent) – The close event triggered by the window manager.
- create_phantom()[source]
Generate and load a synthetic phantom XRD-CT dataset into the GUI.
This method creates a 3D synthetic chemical imaging volume based on known diffraction patterns of common elements (Al, Cu, Fe, Pt, Zn). It uses pre-defined 2D spatial templates and overlays them with their respective spectral signatures to construct a realistic simulated XRD-CT dataset.
The generated volume is loaded into the viewer, and internal data structures are updated (including axis labels, spinbox limits, and dataset name). An initial visualization is triggered via self.explore().
If the process fails (e.g. missing dependencies or runtime errors), a critical message box is shown.
Notes
This function relies on modules within the nDTomo.sim and nDTomo.methods namespaces.
- explore()[source]
Display the mean image and mean spectrum from the loaded chemical imaging dataset.
This method calculates the average projection of the 3D volume along the spectral axis and displays it in the image panel. It also computes the mean spectrum across all spatial positions and displays it in the spectrum panel. Interactive tools are initialized to allow real-time cursor-based inspection of local spectra and image slices.
Functionality
Computes and displays the mean image (volume.mean(axis=2)) using the current colormap.
Computes and displays the mean spectrum (volume.mean(axis=(0, 1))) as a 1D plot.
Adds a vertical cursor line to the spectrum panel (movable by mouse hover).
- Enables interactive updates:
Hover over the image shows the corresponding spectrum at that pixel.
Hover over the spectrum shows the corresponding image slice at that channel.
Scroll wheel zooms on both image and spectrum panels.
Left-click toggles real-time updates on; right-click toggles them off.
- raises ValueError:
If no data volume has been loaded (self.volume.size == 0).
- export_roi_image()[source]
Export the currently displayed ROI image to disk.
This method saves both the raw image data and a rendered PNG: - HDF5 file containing the ROI image (I) and the selected channel range (chi, chf). - PNG image of the ROI visualized with the current colormap.
The filenames are generated based on the original HDF5 filename and the ROI range.
Notes
This function assumes that self.image and self.hdf_fileName are valid. If no image or filename is available, it prints a warning and exits.
- export_roi_pattern()[source]
Export the segmented ROI-averaged pattern to multiple file formats.
Saves the 1D ROI pattern (self.spectrum) and corresponding x-axis values (self.xaxis) to an HDF5 file (.h5) and two plain text formats (.asc and .xy). Filenames include the current threshold value used for segmentation.
Notes
This method will print a warning if self.spectrum is empty or no HDF5 file was previously loaded.
- exportdp()[source]
Export the current spectrum (diffraction pattern) to HDF5 and text-based formats.
Saves the currently displayed 1D spectrum (from the selected pixel) and its corresponding x-axis to three separate files: - .h5 file containing datasets I and xaxis - .asc text file with two columns: x-axis and intensity - .xy text file with the same format as .asc
Output filenames include the pixel coordinates (x, y).
Notes
This function requires that self.hdf_fileName, self.spectrum, self.xaxis, and pixel coordinates self.x, self.y are defined.
- exportim()[source]
Export the current spectral/scattering image to HDF5 and PNG formats.
Saves the currently displayed 2D image (at a specific spectral index) to: - .h5 file containing datasets I (image) and Channel (index) - .png file visualizing the image using the active colormap
Notes
This function requires self.hdf_fileName, self.image, and self.index to be defined and valid.
- fileOpen()[source]
Open and load a chemical imaging dataset via file dialog.
Opens a file browser to select an HDF5 (.h5 or .hdf5) file, loads the dataset into memory, updates the dataset label in the GUI, and calls explore() to display the data.
Notes
Internally calls self.loadchemvol() to read the file contents.
Only one dataset is loaded at a time using this method.
- init_console()[source]
Launch an embedded IPython console inside the GUI.
This method creates a dockable widget hosting a fully interactive IPython (Jupyter) console. The console allows the user to inspect and manipulate GUI-level variables such as volume, image, spectrum, and xaxis using NumPy and Matplotlib interactively within the same application.
If the console has already been initialized, this method brings it back into view.
Notes
The console is powered by qtconsole and runs an in-process kernel, meaning it shares memory with the main application context.
- loadchemvol()[source]
Load a chemical imaging volume and spectral axis from the current HDF5 file.
Reads the 3D dataset from /data and an associated axis (e.g., /twotheta, /q, etc.) from the file self.hdf_fileName, performing shape and compatibility checks.
Updates GUI elements such as channel range spin boxes and sets the axis label.
- Raises:
FileNotFoundError – If self.hdf_fileName is not set.
KeyError – If the expected dataset /data is not found in the file.
- on_canvas_scroll(event)[source]
Handle zooming interactions triggered by mouse scroll events.
This method responds to scroll wheel events within the image or spectrum axes. When scrolling up, it zooms in around the cursor location; when scrolling down, it zooms out. Zooming is applied symmetrically in both axes around the cursor.
- Parameters:
event (matplotlib.backend_bases.MouseEvent) – The scroll event containing information about which axis the cursor is over, the direction of the scroll, and the data coordinates of the cursor.
Notes
Scroll up zooms in (magnifies view around cursor).
Scroll down zooms out (restores a wider view).
Has no effect if the scroll occurs outside the plotting axes.
- plot_fit_results(ind)[source]
Plot a selected parameter map from the peak fitting results.
- Parameters:
ind (int) – Index of the parameter to display: - 0: Peak area - 1: Peak position - 2: FWHM - 3: Background 1 slope - 4: Background 2 intercept
reconnects (The method updates the image panel with the selected map and)
controls. (interactive)
- plot_mean_image()[source]
Compute and display the mean ROI image based on selected channel range.
The method: - Calculates a mean image from the 3D volume using channels from chi to chf. - Normalizes the image to a 0-100 range. - Automatically estimates a central peak position for fitting. - Generates a binary mask from the image using a fixed threshold (5%). - Updates the image canvas with the new ROI visualization.
- plot_mean_image_linear_bkg()[source]
Compute and display a mean ROI image with linear background subtraction.
The background is estimated per-pixel as a linear interpolation between the values at the start (chi) and end (chf) channels. This estimated background is subtracted from the raw ROI before summing.
Steps: - Fit a linear background for each pixel across the ROI channel range. - Subtract the background from the ROI signal. - Clip negative values and rescale to 0-100. - Create a binary mask (values above 5%). - Display the result in the image viewer.
- plot_mean_image_mean_bkg()[source]
Compute and display a mean ROI image with constant background subtraction.
The background is estimated as the mean of the start (chi) and end (chf) channels, and subtracted from the sum across the selected ROI channel range.
Steps: - Normalize the ROI volume. - Subtract mean of boundary channels from the summed signal. - Clip negative values and rescale to 0-100. - Generate a binary mask (thresholded at 5%). - Display the processed image in the main viewer.
- plot_roi_pattern()[source]
Compute and display the ROI-averaged pattern based on the current segmentation mask.
Multiplies each spectral slice by the binary mask to isolate the ROI region, then integrates across all pixels to generate a 1D spectrum. The spectrum is normalized and plotted in the spectral view.
- profile_function(ind)[source]
Set the peak profile type for curve fitting based on user selection.
Updates internal peaktype and toggles the visibility of the mixing fraction (γ) parameter used for Pseudo-Voigt profiles.
- Parameters:
ind (int) – Index from the dropdown selector: - 0: Gaussian - 1: Lorentzian - 2: Pseudo-Voigt
- savechemvol()[source]
Save the current chemical imaging dataset to an HDF5 file.
Prompts the user to select a save location and writes the current 3D volume and x-axis array to disk. Adds a .h5 extension if not present.
File contents
‘data’: The 3D chemical imaging volume.
‘xaxis’: The spectral or scattering axis used for plotting.
- savefitresults()[source]
Export the peak fitting results to an HDF5 file.
Saves the fitted parameter maps (area, position, FWHM, background slope and intercept) to a new .h5 file using the current dataset filename as a base. If the Pseudo-Voigt profile is used, the mixing parameter (‘gamma’) is also saved.
- The resulting file contains:
‘Area’: Peak area map
‘Position’: Peak center position map
‘FWHM’: Full width at half maximum map
‘bkga’: Background slope map
‘bkgb’: Background intercept map
‘gamma’ (if applicable): Mixing fraction between Gaussian and Lorentzian
Notes
This method assumes a dataset has been previously loaded and fitting has been completed.
- segment_image()[source]
Segment the ROI image using the current threshold value.
Applies a simple threshold to the currently displayed ROI image to generate a binary mask. Pixels below the threshold are set to 0, others to 1. The resulting mask is displayed in the image view.
- selXRDCTdata()[source]
Open a file dialog to select one or more XRD-CT datasets.
Extracts dataset names and base paths from the selected files, and populates the GUI list widget (self.datalist) and self.pathslist.
Notes
Uses the custom FileDialog class with multi-selection enabled.
Expects filenames to end with .hdf5.
Silently ignores or logs any parsing errors.
- set_fit_range()[source]
Define the spectral fitting region and normalize the data volume accordingly.
This method updates the region of interest (xroi, volroi) based on the spinbox values for initial and final channels. It also normalizes the ROI data and updates the peak position spinboxes to reflect the new fitting range.
- Raises:
QtWidgets.QMessageBox – If the selected channel range is invalid (i.e., final ≤ initial).
- set_thr(value)[source]
Set the threshold value used for segmenting the ROI image.
- Parameters:
value (int) – Threshold value (0–100) used to binarize the ROI image.
- stop_console()[source]
Shut down the embedded IPython console and its kernel.
This method stops the running IPython kernel and disconnects the console client. It is triggered when the user exits the docked console interface.
- stopfit()[source]
Stop the ongoing peak fitting process.
Requests the fitting thread to stop gracefully, resets the progress bar, and re-enables the fit button for user interaction.
- suggest_peak_positions()[source]
Automatically detect and visualize candidate peak positions in the ROI-averaged spectrum.
Uses scipy.signal.find_peaks to identify prominent peaks based on height and spacing thresholds. Detected peaks are displayed as vertical lines overlaid on the spectrum plot:
The first peak is highlighted in red.
All other peaks are shown in green.
The image viewer is updated to show the spectral slice corresponding to the first detected peak. Detected peak positions are also stored internally for future reference.
- Raises:
Warning dialog if no spectrum is available or no peaks are found. –
- sync_peak_position_from_roi()[source]
Automatically update peak position guess based on ROI channel selection.
This method sets the peak position (pos_spin) and bounds (pos_min_spin, pos_max_spin) using the midpoint of the selected channel range in the ROI tab. It helps keep peak fitting parameters in sync with image generation settings.
- toggle_real_time_image(event)[source]
Toggle real-time image updates when hovering over the spectrum plot.
Enables or disables live image updates depending on which mouse button is pressed while clicking on the spectrum plot.
- Parameters:
event (matplotlib.backend_bases.MouseEvent) – Mouse event object. Left-click enables, right-click disables real-time updates.
- toggle_real_time_spectrum(event)[source]
Toggle real-time spectrum updates when hovering over the image plot.
Enables or disables live spectrum display depending on which mouse button is pressed while clicking on the image plot.
- Parameters:
event (matplotlib.backend_bases.MouseEvent) – Mouse event object. Left-click enables, right-click disables real-time updates.
- update_image(event)[source]
Update the 2D image view based on mouse hover over the spectrum plot.
When the user moves the mouse cursor along the spectral axis (ax_spectrum), this method determines the corresponding index in the spectral axis and displays the corresponding 2D slice from the volume.
- Parameters:
event (matplotlib.backend_bases.MouseEvent) – Mouse event object triggered by hover in the spectrum axis.
Behavior
--------
index. (- Translates the hovered x-axis position to the nearest spectral)
view. (- Extracts the corresponding image slice and updates the image)
match. (- Moves the red vertical cursor line in the spectrum plot to)
colorbar. (- Automatically adjusts color limits and updates the)
Notes
Handles both default x-axis and inverted axes (e.g., d-spacing).
Ensures compatibility with mouse wheel zoom and interaction events.
- update_live_fit_image(live_data)[source]
Update the image display with intermediate peak fitting results.
This method is triggered during batch fitting to provide real-time visual feedback of the parameter currently selected in the “Live view” dropdown (Area, Position, or FWHM). It redraws the image canvas using the latest fitting results for the selected parameter and reconnects all interactive events to maintain responsiveness.
- Parameters:
live_data (np.ndarray) – A 2D array representing the latest fitting result for a single parameter (typically area), used if no predefined mapping is selected.
- update_spectrum(event)[source]
Update the 1D spectrum plot based on mouse hover over the 2D image.
When the user moves the mouse over the image display (ax_image), this method retrieves the spectrum at the corresponding pixel coordinates and plots it.
If diagnostic mode is enabled and fitting results are available, the fitted peak model and residual (difference between raw and fitted spectra) are also shown.
- Parameters:
event (matplotlib.backend_bases.MouseEvent) – The mouse event object containing position and axis metadata.
Behavior
--------
(x (- Plots the raw spectrum at)
y).
mask (- If diagnostic overlay is enabled and the pixel is within a fitted) –
Plots the model fit (red line) and residuals (green line).
Supports Gaussian, Lorentzian, and Pseudo-Voigt peak profiles.
accordingly. (- Updates plot title and legend)
Notes
Requires valid self.volume, self.xaxis, and axis handles to be initialized.
self.mask must be defined for diagnostics to overlay.
Fit parameters are read from self.res, produced after peak fitting.
- updatefitdata()[source]
Finalize and display peak fitting results after batch processing.
This method is called when the fitting thread signals completion. It updates the internal res dictionary with the final results (e.g. Area, Position, FWHM), re-enables UI controls, and redraws the image panel to show the fitted peak area map. It also reconnects interactive mouse events to restore full responsiveness of the GUI.
Background peak fitting is threaded to avoid freezing the UI:
- class nDTomo.gui.nDTomoGUI.FitData(peaktype, data, x, Area, Areamin, Areamax, Pos, Posmin, Posmax, FWHM, FWHMmin, FWHMmax)[source]
Worker thread for batch single-peak fitting on hyperspectral data.
This class performs pixel-wise non-linear fitting of a single peak model (with linear background) using SciPy’s curve_fit. Runs asynchronously and emits progress and results.
- Parameters:
peaktype (str) – Type of peak profile to fit (‘Gaussian’, ‘Lorentzian’, ‘Pseudo-Voigt’).
data (np.ndarray) – 3D hyperspectral data to fit (X, Y, Channels).
x (np.ndarray) – 1D array of x-axis values corresponding to spectral channels.
Area (float) – Initial, minimum, and maximum values for peak area.
Areamin (float) – Initial, minimum, and maximum values for peak area.
Areamax (float) – Initial, minimum, and maximum values for peak area.
Pos (float) – Initial, minimum, and maximum values for peak position.
Posmin (float) – Initial, minimum, and maximum values for peak position.
Posmax (float) – Initial, minimum, and maximum values for peak position.
FWHM (float) – Initial, minimum, and maximum values for full width at half maximum.
FWHMmin (float) – Initial, minimum, and maximum values for full width at half maximum.
FWHMmax (float) – Initial, minimum, and maximum values for full width at half maximum.
Signals
-------
fitdone (pyqtSignal) – Emitted when the fitting is complete.
progress_fit (pyqtSignal(int)) – Emits fitting progress (0–100).
result_partial (pyqtSignal(np.ndarray)) – Emits a partial result image (area) during processing.
- batchfit()[source]
Perform batch pixel-wise single-peak fitting over a 3D hyperspectral dataset.
The method fits a Gaussian, Lorentzian, or pseudo-Voigt peak with a linear background to each spectrum in the dataset where the mask is non-zero. It uses SciPy’s curve_fit for non-linear least squares optimization with parameter bounds. Progress is emitted after each row to support responsive GUI updates.
For each valid pixel: - Attempts to fit the selected peak model. - On success, stores peak parameters (area, position, FWHM, background terms, and Voigt fraction if applicable). - On failure, stores midpoint values for peak position and width as fallback.
Emits
- progress_fitpyqtSignal(int)
Signal emitting fitting progress in percentage (0–100).
- result_partialpyqtSignal(np.ndarray)
Signal emitting current ‘Area’ map (transposed) for live updating.
- fitdonepyqtSignal()
Signal emitted upon completion of fitting.
Notes
Uses request_stop() flag to allow asynchronous termination from GUI.
Results are stored in the self.res dictionary.
The method ensures fitting is done only where data is present (non-zero mask).
- fitdone
- gmodel(x, A, m, w, a, b)[source]
Gaussian peak model with linear background.
- Parameters:
- Returns:
The evaluated Gaussian function with background.
- Return type:
np.ndarray
- lmodel(x, A, m, w, a, b)[source]
Lorentzian peak model with linear background.
- Parameters:
- Returns:
The evaluated Lorentzian function with background.
- Return type:
np.ndarray
- progress_fit
- pvmodel(x, A, m, w, a, b, fr)[source]
Pseudo-Voigt peak model with linear background.
This is a linear combination of a Gaussian and Lorentzian profile.
- Parameters:
- Returns:
The evaluated Pseudo-Voigt function with background.
- Return type:
np.ndarray
- request_stop()[source]
Signal the fitting thread to stop.
Sets an internal flag that is checked periodically during fitting. Allows the fitting process to be gracefully interrupted without killing the thread.
- result_partial
The GUI is installed via setup.py using entry_points[‘gui_scripts’] to expose the nDTomoGUI terminal command.